Ginger growing in my zone 7a garden
2020 was the year of the pandemic garden, but for me, it was gardening as usual, or unusual. Every year, it seems, I want to try something new, be it a new variety of a old standby, or a new crop altogether. This year it was ginger, a tropical plant and marvelous addition to Asian food, a great tea ingredients (the leaves can be dried and used as tea, too), and wonderful in my fave, tomato ginger soup.
Another plant, close up. Pretty, eh?
Ginger is the hardest plant I have ever grown (yes, even though I have mostly given up on cucumbers due to those nasty cucumber beetles, ginger is harder). Ginger is tropical: it needs heat, water, and lots of organic nutrients. Its long growing season means that you are growing it for baby ginger, the most prized of all the stages anyway. How did I do it?
In January, I went to my favorite Asian grocery (you can also order ginger to plant online) and selected rhizomes with as many fingers and eyes (growth points) as possible. I got home and cut the ginger into chunks, with two eyes at least per piece. I let it air dry overnight to cure. Then I planted each piece in a large (5 inch?) peat pot in seed starting mix, placed them in a tray, watered them with warm, filtered water, and covered the tray with with a plastic dome lid.Then I put it on a heat mat under florescent bulbs placed as close to the top of the dome as possible. After a week to 10 days, the baby gingers sprouted. I let them grow until they touched the plastic dome top, then removed it, and enclosed the shelf in plastic sheeting to increase humidity. I kept the heat mat on the entire time the plants were indoors.
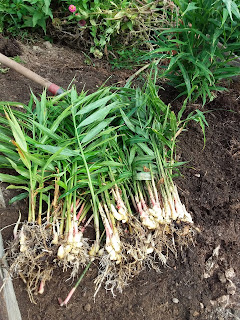
You cannot plant ginger until June, when the soil and air temps are warm enough. I planted them in enriched soil, mounded them with compost, spent potting soil, and coffee bean chaff from my local coffee roaster. I kept it well watered, but not damp all the time, and regularly fed it more compost, vermicompost tea, and diluted fish emulsion. I harvested it in early September...and...it worked!
Part of the harvest
Here is what I did with it. First, ginger freezes well. Clean, cut up into sections, and freeze. The skin scrapes off easily with a knife when you are ready to use it, but the skin is so tender, it hardly matters. Second, I put sections into a glass jar, topped it with white sherry, and put in the fridge. Keeps for months, can be sliced and added to stir fries. Lastly, I made my own pickled ginger for sushi...yum!
Oh, also....I am drawing it!
Next year, I will try to grow turmeric as well!
Happy garden planning!


2 comments:
That's awesome that all your efforts paid off with an excellent harvest!
Excellent! That is some beautiful ginger. I will use your steps to try it myself. Thanks
Post a Comment